Progress report - Mosaic 1.5" layout
It’s coming along nicely!
Not quickly though! This is certainly not fast. But I really do like it!
Just over a week ago I showed this in its infancy stages. At this point, I figure it is just over 1/4 finished.
I took the first picture here just to show you how I’m doing it in segments. I think this is the easiest way to work with these small strips and try to keep things from going all caty wompus.

I make sure I work off a strip that is 1. the correct length for sure and 2. the next one in the series. I do that by placing it next to the bigger body of the top and checking for placement of the whites. Then I take it off and use it as the first strip of the next group.
The last two strips you see in this picture sewn together are put there just to show you that I started the next group of strips. I took the picture just to verify that I really do have it all in the right order. With pieces so small and so many pieces, it is easy to get things “messed up”.
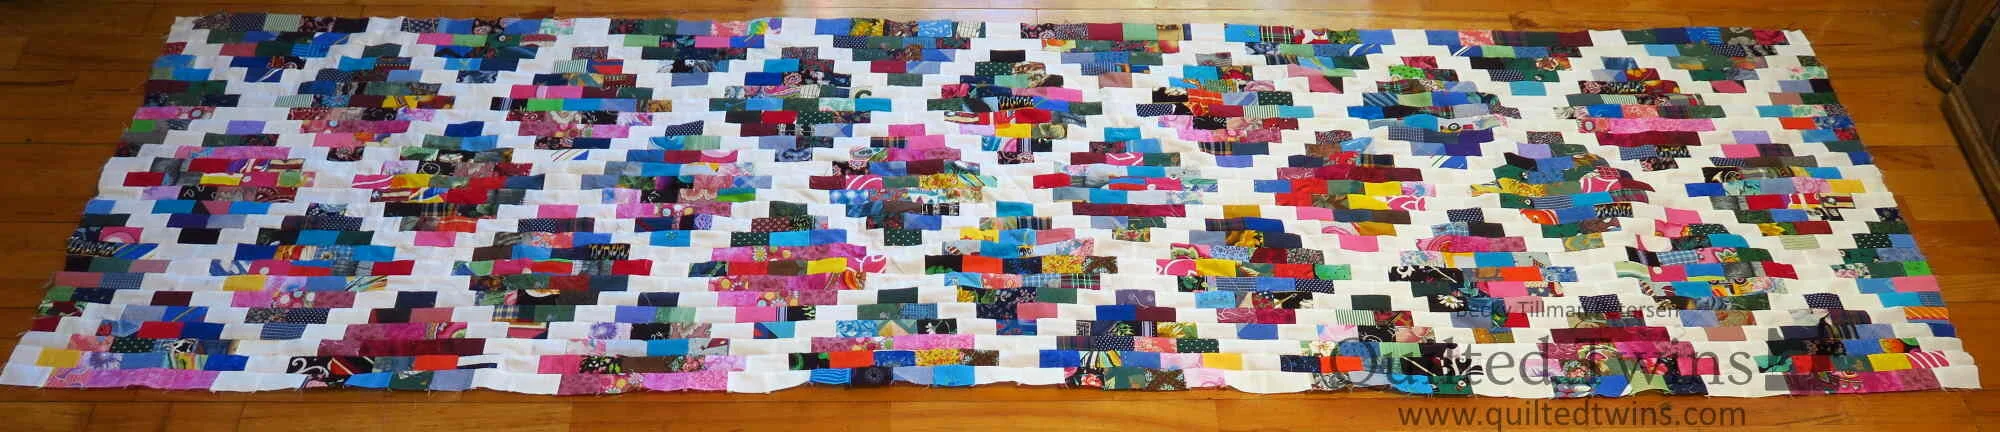
This is just about 1/4 of the way finished. I’ll decide when it gets around 100” long exactly where to end.
If you are wondering what is going on - let me share with you again - this is the layout I’m using.

These bricks are all cut 1.5”x2.5” except for the half sized ones which are a 1.5” square.
Otherwise, I’m following the grid.

I tend to put together the colorful sections first and have them in a plastic zipper bag with others of the same size. Then, when it is time to make a long row strip, I can just pull from those already put together pieces. For example one bag gets the pieces that are 2x, one has all 3x, one has 4x and one has 5x. I have the single ones in a plastic bin. It makes constructing a row a bit faster than taking a single piece and putting it next to another one. You are doing that, but by working in groups, your mind can take a little break while constructing the groups of 3 or 2.
Below is a photo of what I’m referring to.

Here are the little sections of colorful strips. I know I showed what looks like (on the 3x), a white in the middle - but it’s actually a lighter gray which looks white in the light.
I then make a long row. In fact, several of them. I have them clipped together in order, so that when I get in the mood to put them together, I can add several at a time to the top itself. Otherwise, I can busy myself with making rows. I hope that makes sense.
As of this photo, I still have another 10 that I can sew together - the rows are done. However, this progress photo above shows only about 1/4 finished. I think it can be discouraging if I think about it - but since it’s a long term project, it’s fine, I guess! When done, it will be amazing!
And that’s all for this report. If I can keep on working on this at least a little a time, I’ll eventually get it done!
Have a great day wherever you are reading this!
———————-
Be sure to check out what my sis has for you in the store!


Colors may vary slightly from what is portrayed.
Price is by the Yard.