Donated Blocks!
Many years ago now, I had a friend from college contact me on Facebook and ask me if I could use some blocks as they had had some donated to them.
At that time, I said, “Yes”. Eventually they worked their way to my sis and then to me.
(Since then, I’m telling people, “I’d rather not have blocks, but finished tops”.)
Anyway, these blocks were quite old. Hand stitched. Very old fabrics. Sometimes rather…shall I say, “not the same size”.
I put them away somewhere. I figured someday I might get to them. Then time passed and I didn’t know where they were.
I found them in my recent “clearing out” of my sewing room.
I was in the mood to tackle them now. Maybe I just had an idea of what to do.
There were two caveats I had.
I wasn’t redoing the blocks. I was going to use them as is. No taking any apart and fixing them to be flatter or better.
They will be quilted to death by machine because they are hand stitched. I don’t hand stitch things - except things like buttons on clothing and/or couture hems as needed. This hand stitching is not particularly close and I did fix one seam that had opened. (by machine)
To make it short - the blocks were not flat. They were not the same size. They were ugly.


They also used seer sucker in some of the blocks. One of the blocks has some turned sections and they smelled ‘old’. Like your Great Aunt Mary’s house. I only hope when I put it all the washer at the end, the blocks’ fabrics do not disintegrate. (I did have that happen once.)
Anyway, what to do?
I decided to frame each block and trim them down to the same size, making the frames take up the variance and then sash the framed blocks.


Once I had them framed, I decided that I wanted them wonky - that might help.


So that’s what I did. I had a 12.5” square that worked well for trimming them down. I trimmed them into wonky blocks SIMPLY by twisting the square ruler at a wonky angle and trimming.

This did leave every single edge with a bias or at least not “straight edge”. I had to be careful.
I then decided on a denim blue sashing and I used cornerstones. At first I didn’t want to use cornerstones because it takes much longer. However, because every edge was bias, I thought if I used cornerstones, it would help keep things from being ‘off’.
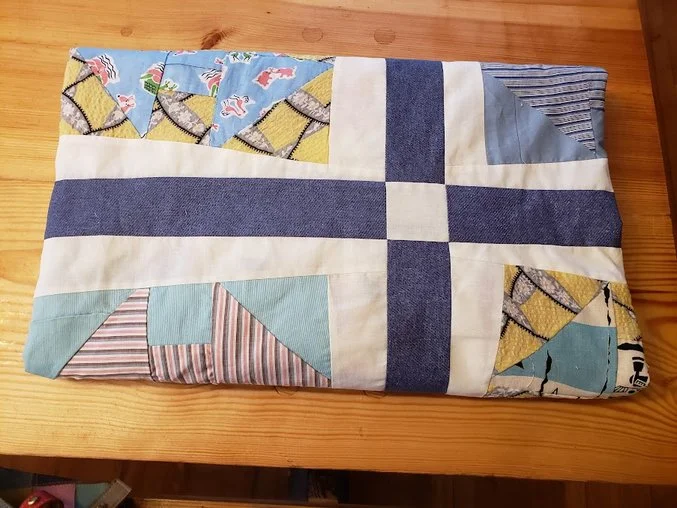
So…here’s my finished top.

It’s going to be a charity quilt.
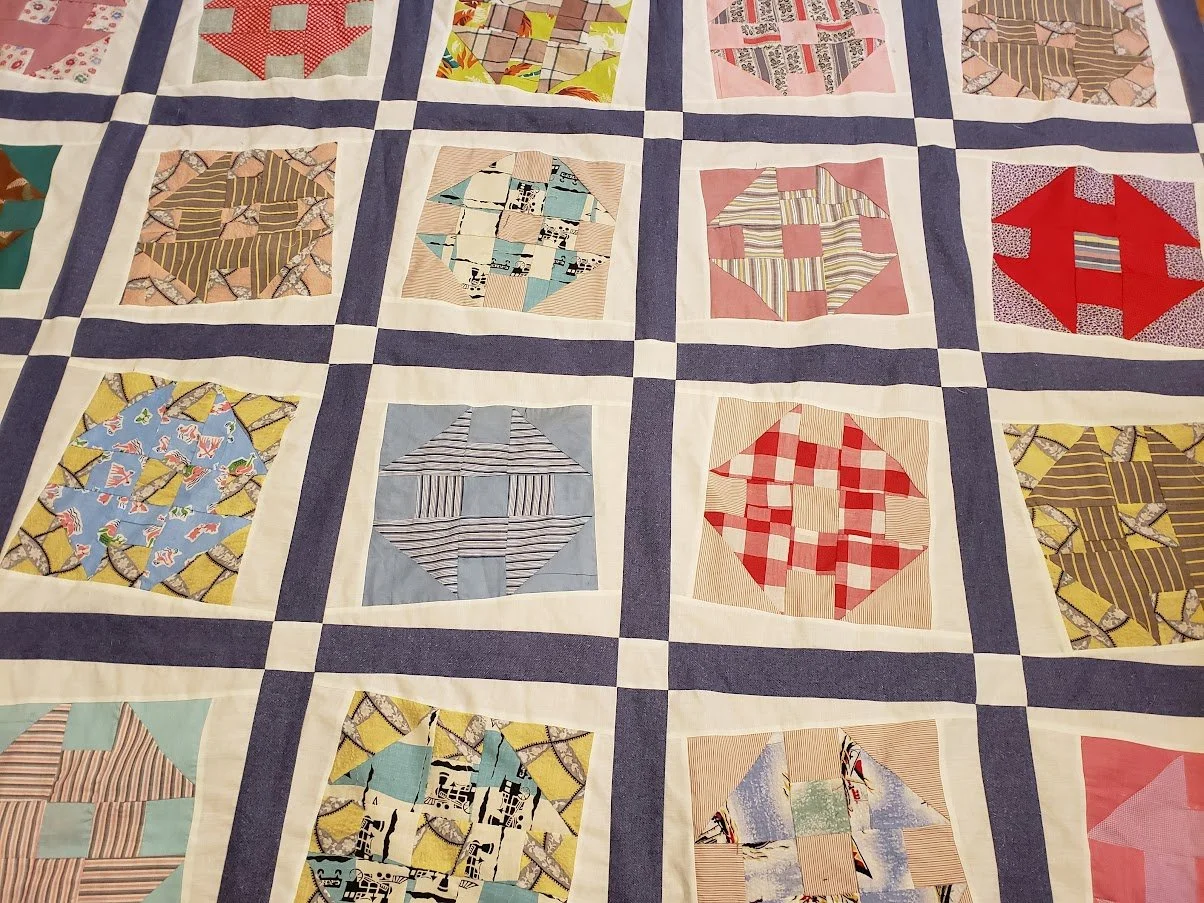
When putting that cream sashing on (which later I trimmed to make them wonky), I didn’t worry about chopping off points. Not one bit. I did what I did because otherwise, the blocks would have been even worse.


The overriding thing I noticed with this is person - and I think I may have had a kindred spirit here - is how much they pieced their fabrics together to get enough to make the individual pieces. Note the rose background and striped one shown above on the left. Many of the blocks have multiple pieced fabrics in them. I put a couple more to the right of these words.
Anyway, I wanted to share with you how I hope I’ve achieved a rescue of these blocks. Due to their different sizes, I couldn’t think of another way to actually use them up without some major reconstructive surgery - something I was unwilling to do.
They are quite old. As I said before, I hope they make it through the first wash after I finish quilting the top!

I do consider this one a “save” and unless they (the blocks) really do fall apart in the wash, I am very pleased with how they turned out. When I’m all done, I’ll send a photo to my friend on Facebook - maybe she’ll remember having sent them to me!
Thanks so much for coming along with me on this journey!
Have a great day wherever you are reading!
Be sure to check out what my sis has for you in the store here!
Feel free to browse the site.